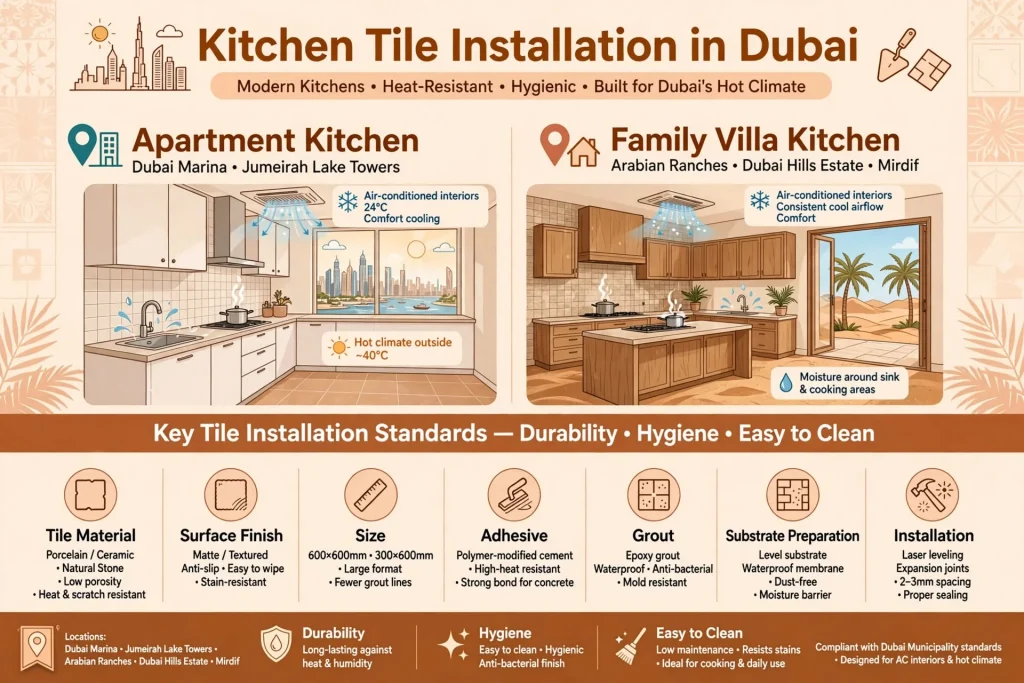
Kitchen tiles play an important role in the appearance, hygiene and long-term durability of a Dubai property. From apartment kitchens in Dubai Marina and Jumeirah Lake Towers to family villas in Arabian Ranches, Dubai Hills Estate and Mirdif, the right tiles can make a kitchen easier to clean, more comfortable to use and better suited to everyday cooking.
However, a successful kitchen tiling project involves more than selecting an attractive colour or pattern. The tile material, surface finish, size, adhesive, grout, substrate preparation and installation method all affect the final result. Dubai’s hot climate, air-conditioned interiors, frequent cleaning and moisture around sinks and cooking areas also make correct material selection important.
This guide explains how to plan kitchen tile installation in Dubai properties, compare suitable tile materials, prepare surfaces, choose adhesives and grout, avoid common installation problems and maintain tiled kitchen floors and walls.
Why Kitchen Tile Installation Requires Careful Planning
A kitchen is one of the busiest areas in a residential property. Floors experience regular foot traffic, dropped utensils, food spills, water splashes and movement of appliances. Wall surfaces around sinks, worktops and cooking areas are exposed to grease, steam and frequent cleaning.
Poorly installed tiles can develop hollow spots, uneven joints, cracked edges, loose sections and grout discolouration. These problems may begin as small defects but can become expensive to repair if moisture reaches the underlying substrate.
In Dubai apartments, kitchens may have compact layouts where tile alignment and cutting around cabinets are especially noticeable. In larger villas, open-plan kitchens often connect with dining and living areas, so flooring transitions and consistent tile levels become important.
Planning the installation before purchasing materials helps prevent unnecessary cuts, mismatched batches, unsuitable finishes and avoidable maintenance problems.
Choosing the Right Kitchen Tiles for Dubai Homes
The best tile depends on where it will be installed, how the kitchen is used and the finish the property owner wants. Porcelain, ceramic, natural stone and decorative tiles are common choices, but each has different performance and maintenance requirements.
Porcelain Tiles for Kitchen Floors
Porcelain tiles are widely used in modern kitchens because they are dense, durable and available in many colours, textures and sizes. They are generally manufactured with relatively low water absorption compared with ordinary ceramic tiles, making them a practical option for areas exposed to occasional spills.
Porcelain floor tiles are available in stone-look, concrete-look, marble-look and wood-effect designs. Large-format porcelain can create a cleaner visual appearance with fewer grout joints, while smaller formats may suit traditional kitchens or areas with more complicated layouts.
For Dubai properties, choose a floor-rated product with a suitable slip-resistant surface. A polished porcelain tile may look elegant, but it can become slippery when wet. A textured or matt finish is often a more practical choice for kitchen floors, particularly around sinks and dishwashing areas.
Ceramic Tiles for Kitchen Walls
Ceramic tiles are a popular option for kitchen backsplashes and wall coverings. They are available in a wide range of colours, patterns, sizes and finishes, making it easier to coordinate the wall design with cabinets, worktops and flooring.
Subway tiles, square ceramic tiles, patterned tiles and glossy finishes are common choices for kitchen walls. Ceramic wall tiles are generally easier to cut than porcelain, which can help when working around electrical sockets, cupboards and plumbing outlets.
For a backsplash, select a tile with a surface that can be cleaned without excessive effort. Deeply textured surfaces and complicated grout patterns may collect cooking residue and require more maintenance.
Natural Stone Tiles
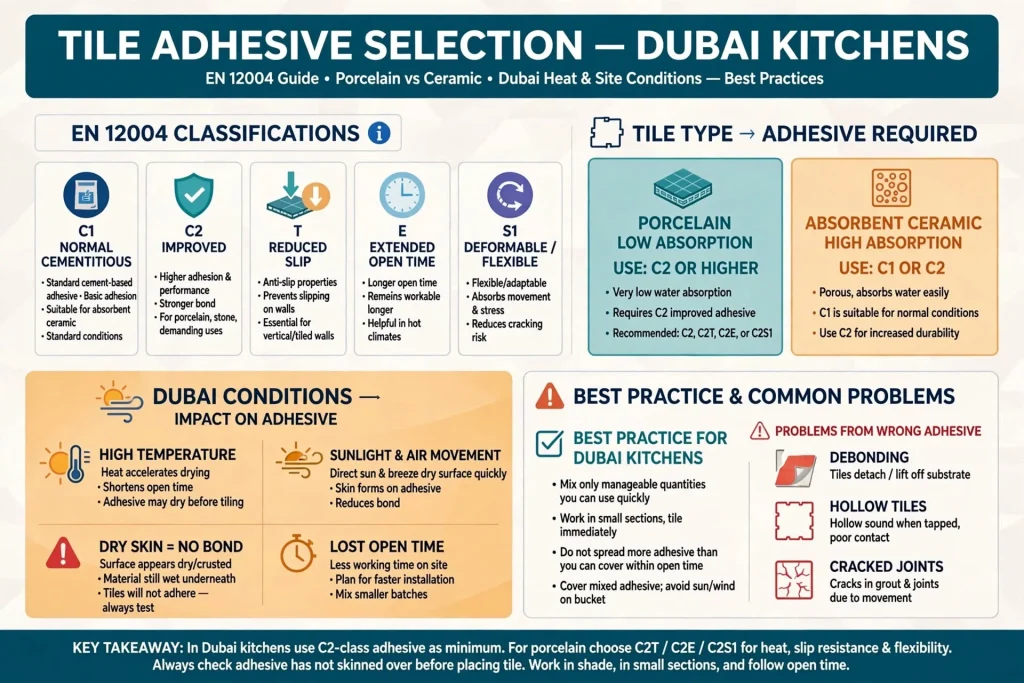
Marble, travertine, limestone and granite can add a distinctive appearance to a kitchen. However, natural stone is not identical to manufactured porcelain or ceramic. Its porosity, hardness, sensitivity to acids and maintenance requirements vary by stone type.
Marble and limestone may be affected by acidic substances such as lemon juice, vinegar and certain food products. Some stones require sealing and specific cleaning products. Before selecting natural stone for a kitchen, confirm its suitability for the intended application and understand its ongoing care requirements.
Mosaic and Decorative Tiles
Mosaic tiles can add detail to backsplashes, niches and feature walls. They are useful for creating borders, patterns and accent sections in contemporary and traditional kitchens.
However, mosaics have more grout joints than large-format tiles. This can increase cleaning requirements, especially near cooking areas. Use them selectively where their decorative effect justifies the additional maintenance.
Kitchen Tile Options at a Glance
| Tile type | Suitable kitchen application | Main consideration |
|---|---|---|
| Porcelain | Floors, walls and backsplashes | Select a suitable slip-resistant floor finish |
| Ceramic | Backsplashes and walls | Check that the product is rated for the intended use |
| Natural stone | Floors, walls and feature areas | Confirm sealing and maintenance requirements |
| Mosaic | Backsplashes and decorative sections | More grout joints require regular cleaning |
| Textured porcelain | Kitchen floors | Check cleanability as well as slip resistance |
Selecting the Right Tile Size and Layout
Tile size influences the visual appearance of a kitchen and the complexity of installation. Large-format tiles can make a compact kitchen appear more continuous because they reduce the number of grout joints. However, they require a sufficiently flat substrate and careful handling during installation.
Common tile formats include:
- 300 × 300 mm for smaller areas and selected traditional layouts.
- 300 × 600 mm for wall coverings and backsplashes.
- 600 × 600 mm for residential kitchen flooring.
- 600 × 1200 mm for larger contemporary interiors, where the substrate and installation system are suitable.
These are common market formats rather than fixed recommendations. Always check the actual dimensions, thickness, intended application and installation requirements of the selected product.
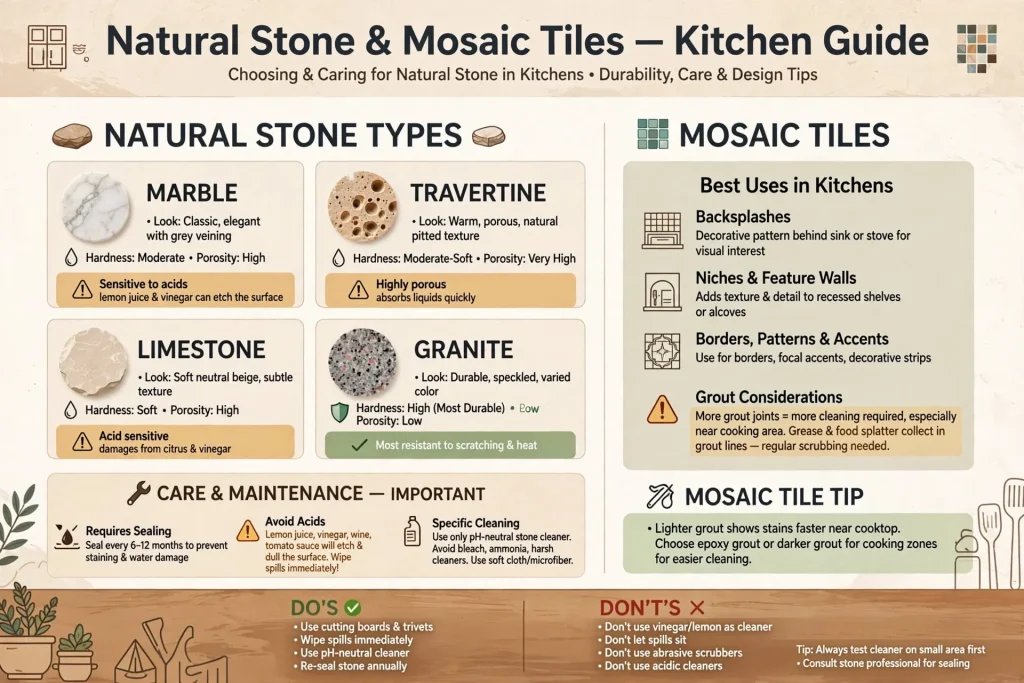
A straight-lay pattern creates a simple, modern appearance. A brick-bond layout can add visual movement to rectangular tiles, while herringbone patterns are often used for decorative backsplashes. Diagonal layouts may change the visual proportions of a room but usually require additional cutting and material.
Before installation, a dry layout helps determine where cuts will fall. The installer should consider cabinet edges, doorways, floor drains, appliance positions and the visibility of grout lines from the main entrance.
Preparing the Kitchen Surface Before Installation
Substrate preparation is one of the most important stages of a kitchen tiling project. Even premium porcelain tiles can fail when installed over a weak, dusty, uneven or damp surface.
For floor installation, the existing concrete or screed should be inspected for cracks, loose material, oil, paint, dust and other contaminants. Any damaged sections must be repaired using a compatible preparation system. The surface should also be checked for level and flatness, particularly when installing large-format tiles.
Wall surfaces need similar attention. Loose plaster, flaking paint and weak areas should be removed or treated appropriately. If the wall has previously been exposed to water, the source of moisture should be identified and resolved before new tiles are installed.
In renovation projects across areas such as Dubai Marina, Downtown Dubai, Business Bay and Jumeirah, existing kitchens may have older tile finishes beneath cabinets or appliances. Removing these finishes can reveal cracks, uneven screed or damaged plaster that was not visible during the initial inspection.
The installer should assess the actual substrate after removal rather than assuming that the old surface is suitable for direct tiling.
Should New Tiles Be Installed Over Existing Kitchen Tiles?
Installing new tiles over existing tiles can sometimes reduce demolition work, dust and project time. However, it is only suitable when the existing tiles are firmly bonded, the surface is stable and the additional floor or wall thickness will not create problems.
Before using this method, check:
- Whether existing tiles sound hollow or move under pressure.
- Whether the old surface is clean and free from grease or polish.
- Whether doors, cabinets and appliances will still fit correctly.
- Whether the added height will affect thresholds and adjoining flooring.
- Whether the selected adhesive is approved for tile-on-tile installation.
Loose or damaged tiles should not simply be covered. If the existing layer is unstable, removing it and preparing a sound substrate is usually the more reliable approach.
Selecting the Correct Tile Adhesive
Tile adhesive creates the bond between the tile and the prepared surface. Choosing an unsuitable adhesive can lead to debonding, hollow-sounding tiles and cracked joints.
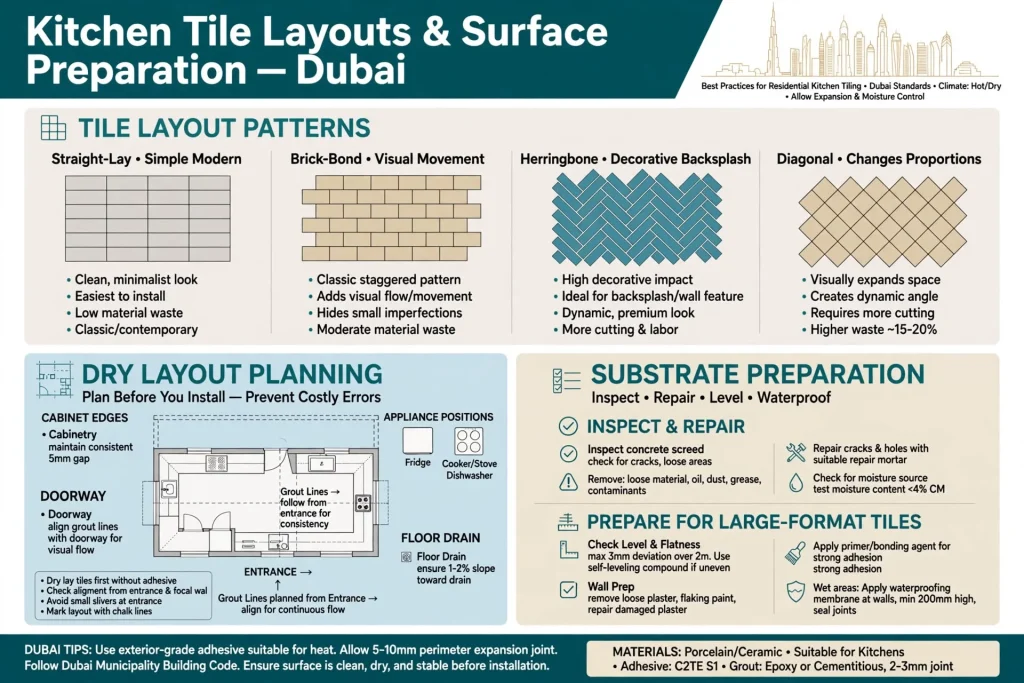
The selection should consider the tile material, size, weight, substrate and installation environment. Porcelain tiles have low water absorption, so they generally require an adhesive designed for porcelain rather than a basic product intended for highly absorbent ceramic tiles.
Cement-based adhesives are commonly used for residential floor and wall tiling. Products classified under EN 12004 provide useful performance information. For example, C1 and C2 identify normal and improved cementitious adhesive performance, while additional classifications such as T, E and S1 describe properties including reduced slip, extended open time and deformability.
For many porcelain installations, an appropriate C2-class adhesive is a common specification to consider. The final selection must still follow the adhesive manufacturer’s instructions and the requirements of the particular tile and substrate.
Dubai’s working conditions also matter. High temperatures, direct sunlight and air movement can shorten the usable open time of some adhesives. Installers should mix manageable quantities, work in suitable sections and avoid spreading more adhesive than can be covered within the product’s stated open time.
A tile adhesive that has formed a dry skin may not provide the required bond, even if it still appears wet underneath. Weber Middle East+1
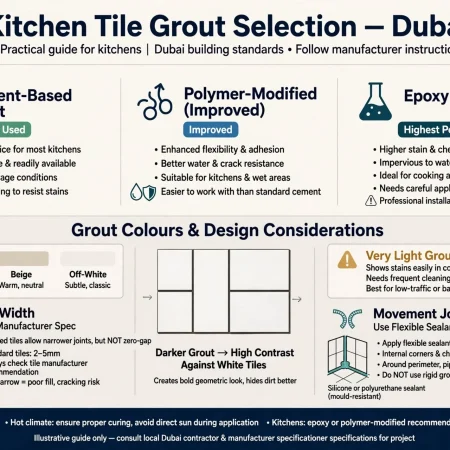
Understanding Kitchen Tile Grout and Joint Width
Grout fills the joints between tiles and gives the finished surface a consistent appearance. It also helps protect the edges of the installation from dirt and everyday cleaning. However, grout is not a substitute for waterproofing or flexible movement joints.
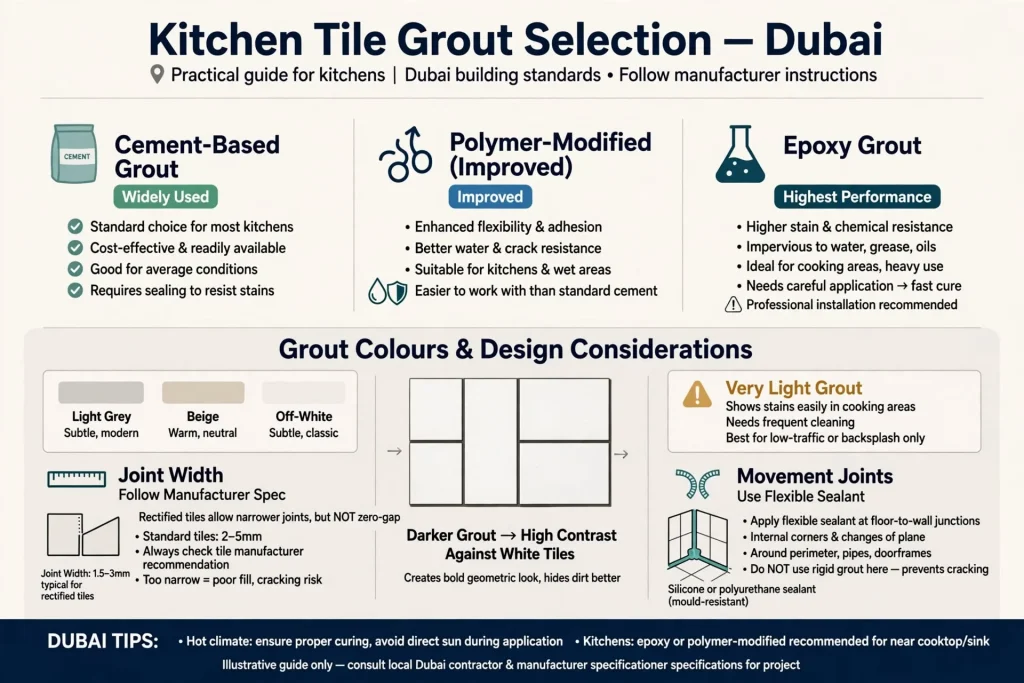
Cement-based grout is widely used for residential kitchens. Polymer-modified options can provide improved performance when selected for the application. Epoxy grout may be suitable in areas where higher stain resistance or chemical resistance is required, but it needs careful application and cleaning.
The grout colour affects the overall appearance of the kitchen. Light grey, beige and off-white can create a subtle finish, while darker grout can provide contrast against white or light-coloured tiles. Very light grout may need more frequent cleaning in high-use cooking areas.
Joint width should be based on the tile manufacturer’s recommendations, tile dimensions, edge type and installation conditions. Rectified tiles may allow narrower joints, but they should not automatically be installed without a grout gap. Small differences in tile dimensions and surface alignment still need to be accommodated.
Movement joints and changes of plane require particular attention. Flexible sealant is generally used at appropriate floor-to-wall junctions, internal corners and other specified movement locations rather than filling every junction with rigid grout.
Waterproofing Around Kitchen Sinks and Plumbing
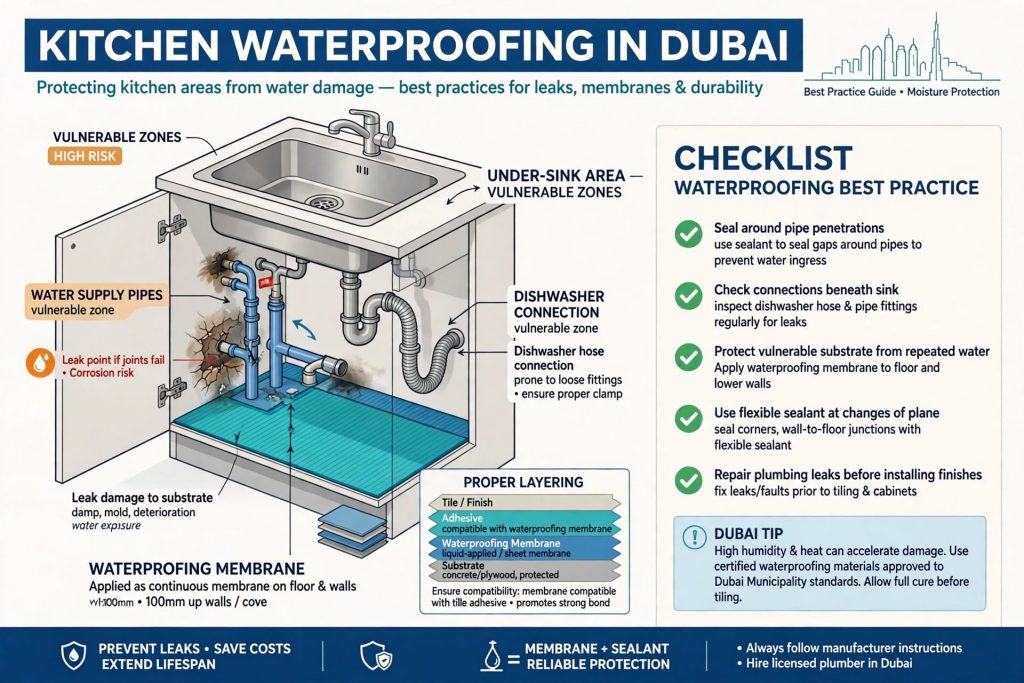
Kitchen floors are not normally exposed to the same continuous water conditions as shower areas, but leaks and repeated splashes can still damage unsuitable substrates. The area beneath a sink, around a dishwasher connection and near water supply pipes deserves careful attention.
A waterproofing membrane may be appropriate where the design, substrate or exposure requires one. Its compatibility with the tile adhesive and the rest of the installation system must be confirmed.
Pay attention to the following details:
- Seal around pipe penetrations using suitable compatible products.
- Check the condition of connections beneath the kitchen sink.
- Protect vulnerable substrate areas from repeated water exposure.
- Use appropriate flexible sealant at relevant changes of plane.
- Repair plumbing leaks before installing new floor or wall finishes.
The tile surface, grout, waterproofing layer and substrate work together as a system. Water can still travel through joints or weak junctions if the underlying installation has not been properly detailed. Weber Middle East+1
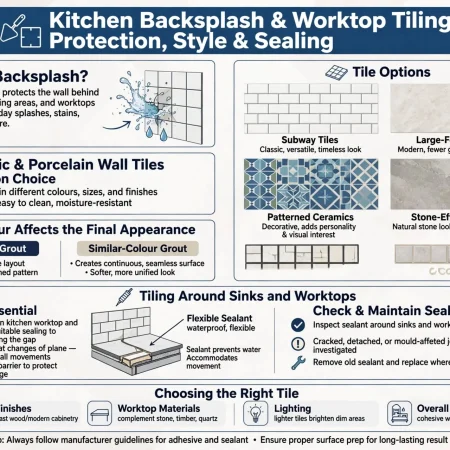
Kitchen Backsplash Tile Installation
A kitchen backsplash protects the wall between the worktop and upper cabinets. It is also an opportunity to introduce colour, texture and a distinctive design feature.
Ceramic subway tiles remain a popular choice for contemporary kitchens, while marble-look porcelain and patterned ceramic tiles suit more decorative interiors. Glass mosaics and small-format tiles can also be used for feature sections.
Before installation, the installer should confirm the height of the backsplash, the position of sockets, cabinet edges, cooker hoods and plumbing outlets. Accurate setting-out helps avoid narrow cuts at visible edges and makes the finished design look intentional.
The wall must be clean, sound and suitable for the selected adhesive. Grease should be removed from cooking areas, and loose paint or plaster should not be treated as a reliable fixing surface.
For a consistent finish, check the alignment of grout joints with cabinet edges and worktop lines. Neat cuts around electrical outlets and fittings are particularly important because these details are easily noticed in a finished kitchen.
Step-by-Step Kitchen Tile Installation Process
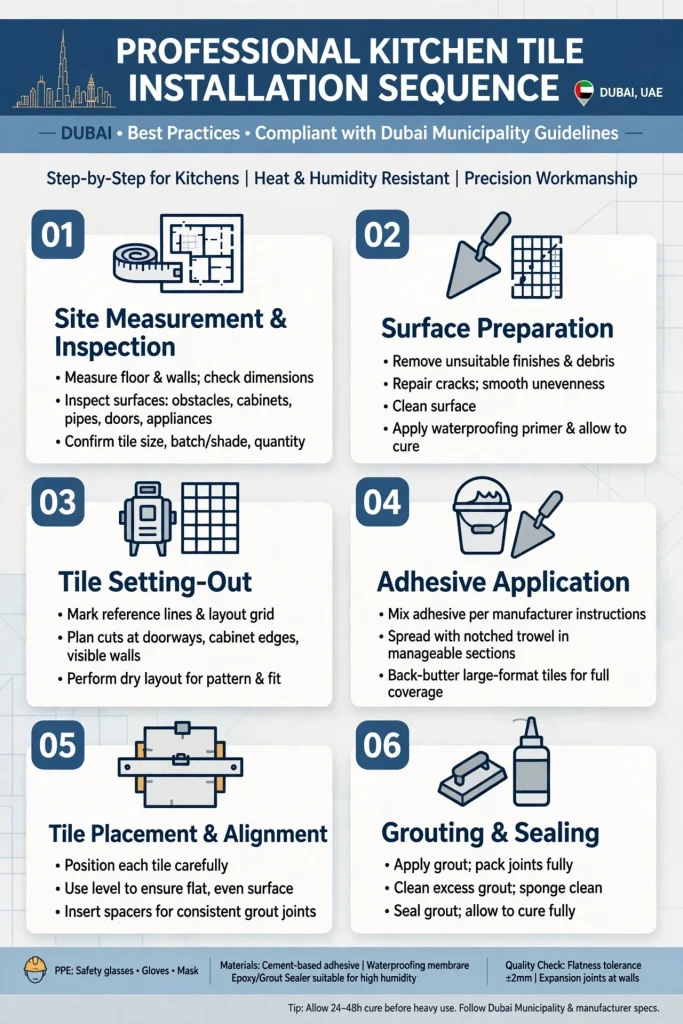
A professional installation follows an organised sequence. The exact method varies with the tile, substrate and site conditions, but the main stages usually include the following.
1. Site measurement and inspection: Measure the floor and wall areas, inspect the existing surfaces and identify obstacles such as cabinets, pipes, doors and appliances. Confirm the tile size, batch, shade and quantity before work begins.
2. Surface preparation: Remove unsuitable finishes, repair cracks, clean the substrate and correct significant unevenness. Any required waterproofing or primer should be completed using compatible products and allowed to cure as specified.
3. Tile setting-out: Establish reference lines and plan the tile layout. Check the position of cuts at doorways, cabinet edges and visible walls. A dry layout can help confirm the pattern before adhesive is applied.
4. Adhesive application: Mix the selected adhesive according to its technical instructions. Apply it with a suitable notched trowel and work in manageable sections. Large-format tiles may require additional back-buttering to improve adhesive contact.
5. Tile placement and alignment: Position each tile carefully, maintain consistent joints and check the finished surface for lippage. Tile levelling clips may help manage alignment on suitable large-format installations, but they do not replace a properly prepared substrate.
6. Grouting: Allow the adhesive to cure for the required period before filling the joints. Remove excess adhesive from the joints, clean the surface and apply grout according to the manufacturer’s instructions.
7. Flexible joint finishing: Complete the specified movement joints and junctions using suitable flexible sealant. Do not fill designated movement joints with rigid grout.
8. Final inspection and handover: Check the tile alignment, joint consistency, surface cleanliness, edges and transitions. Confirm that the installation has been allowed to cure before heavy use or appliance movement.Weber Middle East+2
Kitchen Tile Design Ideas for Dubai Properties
Dubai homes feature a wide range of interior styles, from compact contemporary apartments to spacious family villas. The tile design should complement the property’s cabinets, worktops, lighting and overall interior scheme.
Modern Apartment Kitchens
In apartments in Dubai Marina, JLT, Business Bay and Downtown Dubai, large-format porcelain in light grey, beige or soft stone finishes can create a clean and spacious appearance. Matching floor and backsplash colours can make a compact kitchen feel more visually connected.
Luxury Villa Kitchens
Properties in Dubai Hills Estate, Arabian Ranches, Palm Jumeirah and Emirates Hills may feature larger kitchens with islands and open-plan layouts. Marble-look porcelain, natural stone accents and coordinated backsplash designs can complement premium cabinetry and stone worktops.
Family Kitchens in Mirdif and Al Furjan
For busy family kitchens, practical matt porcelain flooring and easy-to-clean ceramic backsplashes can offer a balance between appearance and everyday maintenance. Mid-tone finishes may also help make small marks and dust less noticeable between cleaning sessions.
Open-Plan Kitchens
Where the kitchen connects to a dining or living area, the floor tile should coordinate with adjoining finishes. Consistent tile levels and carefully planned transitions help create a continuous appearance without awkward edges or unnecessary height differences.
Common Kitchen Tiling Problems and How to Avoid Them
Even a high-quality tile can produce a poor result if installation details are overlooked. Understanding common problems helps property owners identify workmanship issues before the project is completed.
| Common problem | Possible cause | How to prevent it |
|---|---|---|
| Hollow-sounding tiles | Poor adhesive coverage or an unsuitable substrate | Prepare the surface and achieve the required adhesive contact |
| Cracked grout | Movement, incorrect mixing or unsuitable joint detailing | Follow grout instructions and provide movement joints |
| Uneven tile edges | Poor setting-out or substrate irregularities | Check surface flatness and use appropriate levelling methods |
| Loose tiles | Incompatible adhesive or inadequate bonding | Select adhesive for the tile and substrate |
| Stained grout | Grease, spills or unsuitable cleaning products | Choose suitable grout and clean regularly |
| Water damage near the sink | Leaking plumbing or poorly sealed junctions | Repair leaks and detail vulnerable areas correctly |
| Chipped tile edges | Poor cutting or handling | Use suitable cutting equipment and protect finished edges |
One common mistake is using adhesive as a thick levelling material to compensate for an uneven floor. Significant surface irregularities should be corrected with an appropriate levelling or screeding product before tile fixing. Adhesive should be applied within the thickness limits stated by its manufacturer.
Another mistake is assuming that grout alone makes a kitchen floor waterproof. Grout fills joints, but waterproofing performance depends on the complete installation system, including the substrate, membrane where required, junctions and penetrations.
How Dubai’s Climate Affects Kitchen Tile Installation
Dubai’s climate creates practical considerations during both installation and long-term maintenance. High outdoor temperatures can affect materials stored or handled in exposed areas, while air-conditioned interiors create different temperature and humidity conditions.
During renovation, tiles, adhesives and grout should be stored according to their manufacturers’ recommendations. Materials should not be left exposed to unsuitable heat or moisture before use. Installers should also monitor working conditions because temperature and airflow can influence adhesive open time and curing.
In coastal locations such as Dubai Marina, Jumeirah Beach Residence and Palm Jumeirah, humidity and moisture exposure may be relevant to the wider property environment. However, ordinary indoor kitchen tile selection should still be based primarily on the actual application, product specifications and expected use.
Movement joints should also be considered as part of the installation design. Buildings and their floor assemblies can experience movement due to temperature changes, structural behaviour and other factors. Correctly positioned flexible joints help accommodate movement where the installation system requires them.
Maintaining Kitchen Floor and Wall Tiles
Regular maintenance helps preserve the appearance of kitchen tiles and grout. The cleaning method should match the material rather than relying on one chemical for every surface.
For porcelain and ceramic tiles, routine sweeping or vacuuming removes loose dirt before it can scratch the finish. A suitable pH-neutral cleaner and clean water are generally appropriate for everyday cleaning, subject to the manufacturer’s instructions.
Grease around the cooker and backsplash should be removed regularly. Leaving cooking residue for long periods can make cleaning more difficult, particularly on textured tiles and grout joints.
Natural stone requires more specific care. Acidic cleaners, vinegar and abrasive products can damage certain stones or their protective sealers. Always use cleaning products recommended for the particular stone.
Property owners should also inspect grout lines and flexible sealant around sinks, worktops and wall corners. Cracked or deteriorated sealant should be assessed and repaired before moisture reaches vulnerable surfaces.
How to Choose a Kitchen Tile Installation Contractor in Dubai
The quality of the installation depends on both material selection and workmanship. Before appointing a contractor, ask how the team will prepare the surface, select the adhesive, plan the layout and complete the finishing details.
A reliable tiling contractor should be able to explain why a particular tile and adhesive are suitable for the project rather than recommending materials based only on appearance or price.
Check whether the quotation clearly identifies the scope of work. It should explain whether existing tiles will be removed, how waste will be handled, whether substrate repairs are included and who will supply the tiles, adhesive, grout and sealant.
For larger kitchens and villa renovation projects, request details about tile alignment, movement joints, floor transitions and the treatment of plumbing penetrations. Ask to see examples of completed work, especially large-format floor tiles and detailed backsplash installations.
If you are renovating a property in Dubai Marina, Jumeirah, Mirdif, Al Barsha, Dubai Hills Estate or another Dubai community, make sure the contractor understands the access arrangements and practical requirements of the property. Apartment projects may involve building management approvals, permitted working hours, lift bookings and waste removal arrangements.
For professional support with kitchen flooring, backsplash installation, tile replacement and finishing work, explore the Kitchen Tile Installation Service to understand the available tiling solutions for your property.
Kitchen Tile Installation Checklist Before Handover
Before accepting a completed kitchen tiling project, inspect the finished work carefully. A practical handover check should include the following:
- Floor tiles are aligned and have consistent joint spacing.
- There are no visibly damaged or chipped tile edges.
- Tile surfaces are free from excessive adhesive and grout residue.
- Grout joints are filled evenly and have a consistent finish.
- Flexible sealant is neat and continuous at the specified junctions.
- Cuts around pipes, cabinets and fittings are clean.
- Floor transitions and door thresholds are finished safely.
- Any specified waterproofing and plumbing details have been completed.
- The installation has been allowed to cure before heavy use.
The property owner should also receive any relevant product information, cleaning instructions and maintenance recommendations. Keeping details of the tile batch, adhesive and grout can be useful if repairs or replacements are needed later.
Creating a Durable and Attractive Kitchen with Professional Tiling
Kitchen tile installation in Dubai requires a combination of thoughtful design, suitable materials and correct installation techniques. Porcelain flooring, ceramic backsplashes, natural stone accents and decorative mosaics can all work well when selected for the right application.
The most important decisions happen before the first tile is fixed: inspecting the substrate, choosing the correct adhesive, planning the layout, selecting suitable grout and addressing moisture-prone areas. These details help prevent common problems such as loose tiles, uneven surfaces, cracked joints and difficult maintenance.
Whether you are upgrading an apartment kitchen in Downtown Dubai, renovating a family villa in Arabian Ranches or designing a contemporary kitchen in Dubai Hills Estate, a properly planned installation can improve the appearance and everyday usability of the space for years to come.