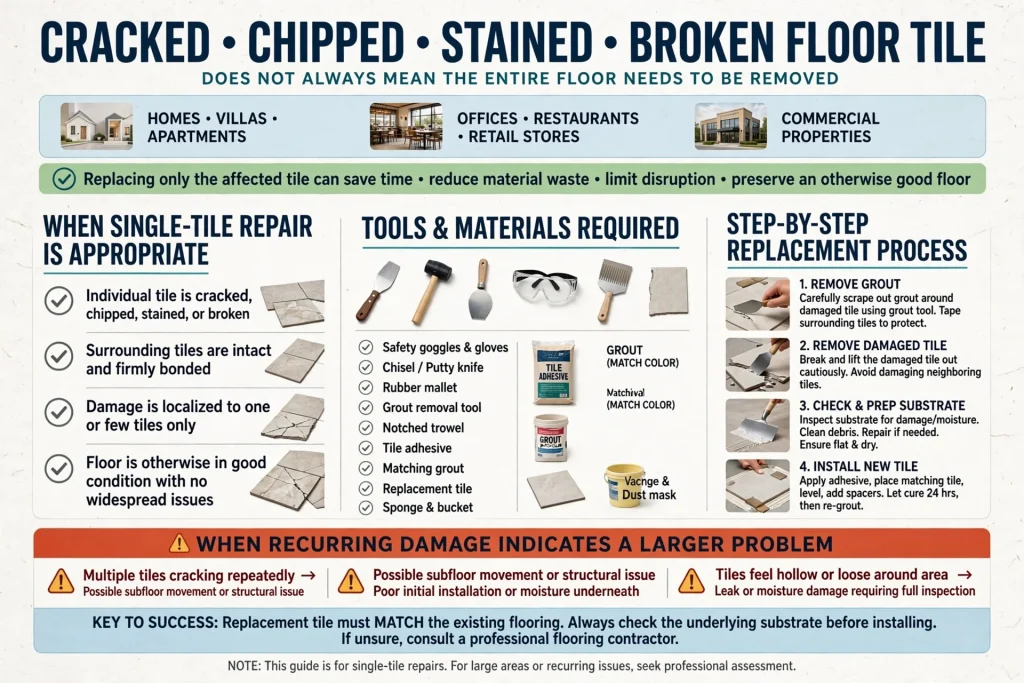
A cracked, chipped, stained, or broken floor tile does not always mean the entire floor needs to be removed. In many homes, villas, apartments, offices, restaurants, retail stores, and commercial properties, an individual damaged tile can be removed and replaced while the surrounding flooring remains in place.
Replacing only the affected tile can save time, reduce material waste, limit disruption, and preserve an otherwise good floor. However, the process requires care because the replacement tile must match the existing flooring, the damaged tile must be removed without breaking neighbouring tiles, and the underlying substrate should be checked before installing the new piece.
This guide explains how to replace damaged floor tiles, when a single-tile repair is appropriate, what tools and materials are required, and when recurring damage indicates a larger flooring problem.
Can You Replace Just One Damaged Floor Tile?
Yes. A single floor tile can usually be replaced when the surrounding tiles are properly bonded, the substrate is stable, and a matching replacement tile is available.
This approach works particularly well when the damage is isolated. For example, one tile may have cracked because a heavy object was dropped on it while the rest of the floor remains intact.
Individual replacement is common with ceramic and porcelain floor tiles. It can also be used for certain natural stone flooring systems, although stone replacement may require additional colour and finish matching.
Before starting, inspect the surrounding area. If several tiles are loose, hollow-sounding, cracked, or lifting, replacing only one tile may not address the underlying cause.
When Should You Replace an Individual Tile?
Single-tile replacement is generally suitable when the damage is localized.
Typical situations include a tile that has:
- A visible crack
- A chipped corner
- A broken section
- Severe staining that cannot be cleaned
- Surface damage from impact
- Damage caused by dropped furniture or equipment
- A localized defect
- Damage caused during another repair
A single replacement is also useful when a property owner wants to maintain the existing floor rather than undertake a complete renovation.
For example, an apartment in Dubai Marina may have one cracked kitchen tile while the remainder of the flooring is in good condition. Replacing the affected tile can restore the appearance without disturbing the entire room.
When Should You Not Replace Only One Tile?
Single-tile replacement is not always the right solution.
If cracks appear repeatedly in the same location, several tiles are damaged along a straight line, or tiles are lifting from the substrate, the underlying problem should be investigated.
Possible causes include:
- Substrate movement
- Concrete or screed cracking
- Poor adhesive coverage
- Moisture intrusion
- Inadequate movement joints
- Plumbing leakage
- Thermal movement
- Poor original installation
Replacing individual tiles without correcting these conditions may result in the new tile cracking or becoming loose.
Finding a Matching Replacement Tile
One of the biggest challenges is finding a replacement tile that matches the existing floor.
Try to identify the original:
- Manufacturer
- Product collection
- Tile size
- Colour
- Surface finish
- Thickness
- Pattern
- Batch or shade
Even tiles that appear identical in a showroom can have small variations between production batches.
If the original tile is no longer available, check whether spare tiles were stored after the original installation. Many property owners keep leftover tiles specifically for future repairs.
For rental properties, villas, offices, and commercial buildings, keeping a small quantity of spare flooring material can make future repairs much easier.
Tools and Materials for Tile Replacement
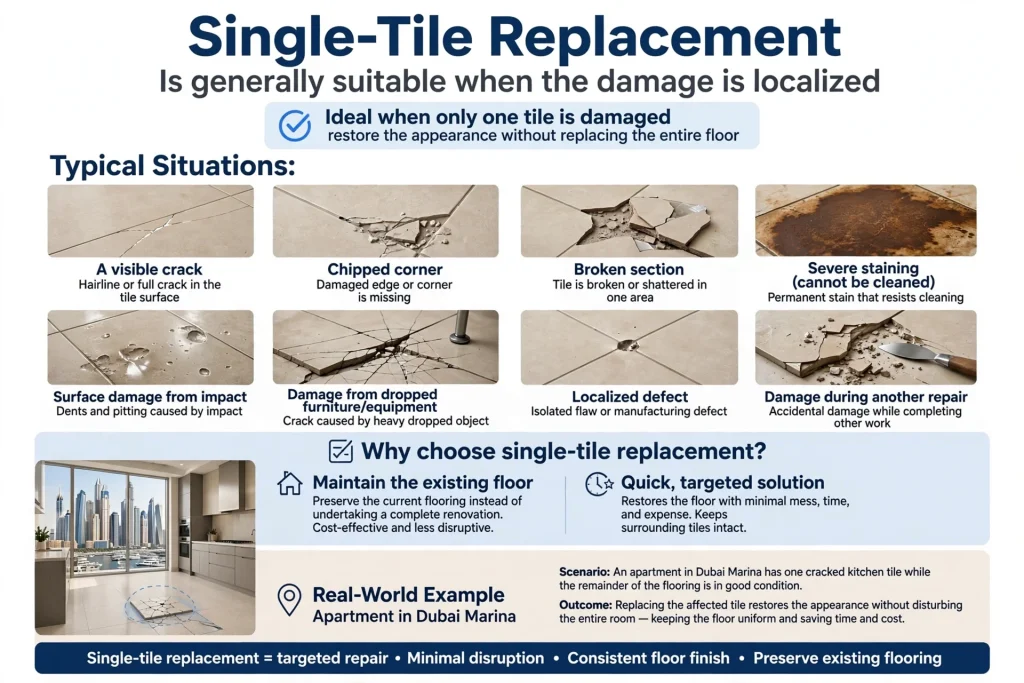
The exact equipment depends on the tile and installation system, but a professional replacement may require a tile cutter, grout removal tool, hammer, chisel, scraper, vacuum, suitable tile adhesive, notched trowel, spacers, grout, sponge, and safety equipment.
For porcelain tiles, appropriate cutting equipment is important because porcelain is dense and hard.
Safety glasses and gloves should be used during removal because broken ceramic and porcelain can create sharp fragments.
The surrounding floor should also be protected before work begins.
Step 1: Remove the Grout Around the Damaged Tile
The first stage is to remove the grout surrounding the damaged tile.
This creates separation between the tile being replaced and the neighbouring tiles. It reduces the chance of transferring impact into adjacent tiles during removal.
Grout can be removed manually or with suitable power tools. The work should be controlled carefully, especially where the surrounding tiles are in good condition.
Do not rush this stage. Protecting neighbouring tiles is one of the most important parts of a successful single-tile replacement.
Step 2: Break the Damaged Tile Carefully
A damaged tile is normally removed from the centre rather than aggressively attacking its edges.
The tile can be scored or carefully drilled toward its centre before controlled removal. Small sections can then be removed gradually.
The goal is to reduce pressure on the surrounding tiles.
Porcelain flooring requires particular care because it is dense and can transmit force into adjacent tiles if the removal process is too aggressive.
Step 3: Remove the Old Adhesive
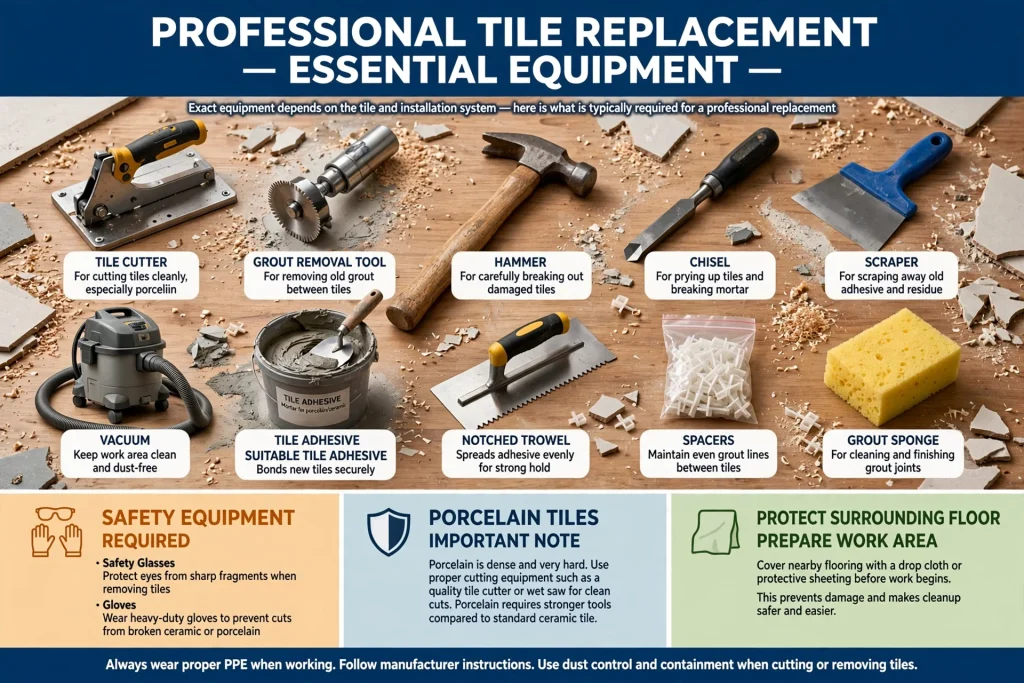
After the damaged tile has been removed, inspect the exposed surface.
Old adhesive should be removed sufficiently to create a suitable base for the replacement tile. The substrate should be stable, clean, and free from loose material, dust, oil, or other contamination.
Do not simply place the replacement tile on top of excessive old adhesive because this can affect the finished level and bonding.
The surrounding tile edges should also be checked for damage.
Step 4: Inspect the Substrate
This step is often overlooked, but it is important.
Look for cracks, moisture, loose screed, uneven areas, or other signs that the underlying floor may be contributing to the tile failure.
If the substrate has a significant crack directly beneath the damaged tile, simply installing another tile may not provide a lasting solution.
Likewise, if moisture is present, the source should be identified before completing the repair.
In bathrooms, kitchens, balconies, and other wet areas, plumbing and waterproofing should be considered if there are signs of water damage.
Step 5: Prepare the Tile Adhesive
Use a tile adhesive compatible with the tile type and substrate.
Porcelain and ceramic tiles may have different installation requirements, and the adhesive manufacturer’s recommendations should be followed.
The adhesive should be mixed according to the manufacturer’s instructions rather than adding arbitrary amounts of water.
Incorrect mixing can affect working time, bonding, curing, and final performance.
Step 6: Apply the Adhesive Correctly
Apply the adhesive using an appropriate notched trowel.
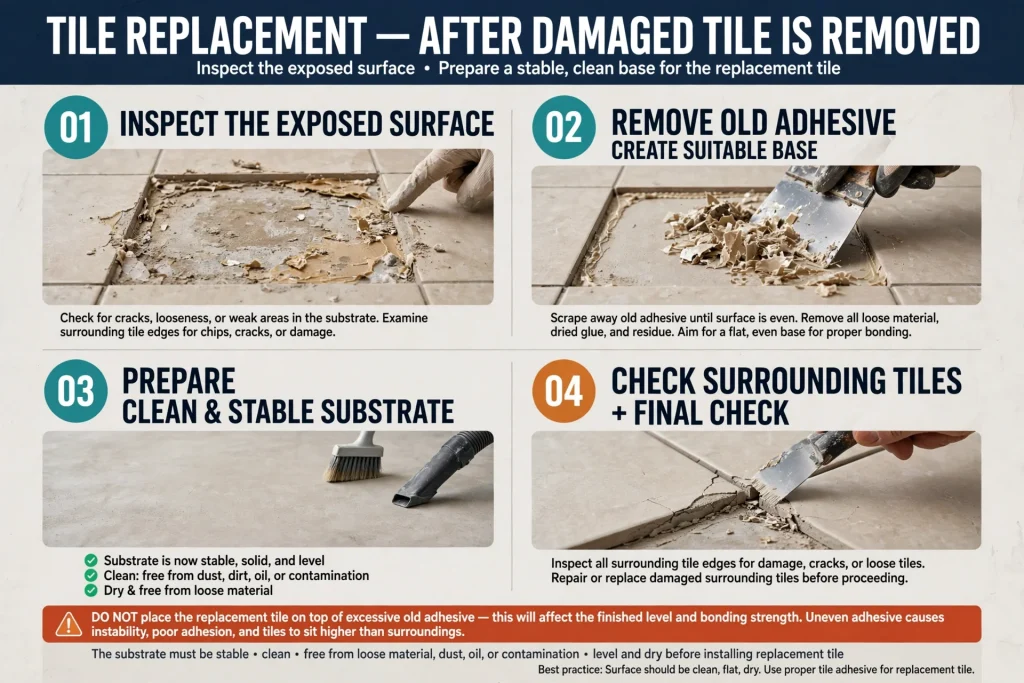
The objective is to create suitable contact between the tile and substrate. Avoid leaving large unsupported voids beneath the tile.
For larger tiles, installation techniques such as back-buttering may be appropriate depending on the tile dimensions, substrate, and adhesive system.
Good adhesive coverage helps reduce hollow areas and improves the tile’s ability to handle normal loads.
Step 7: Position the Replacement Tile
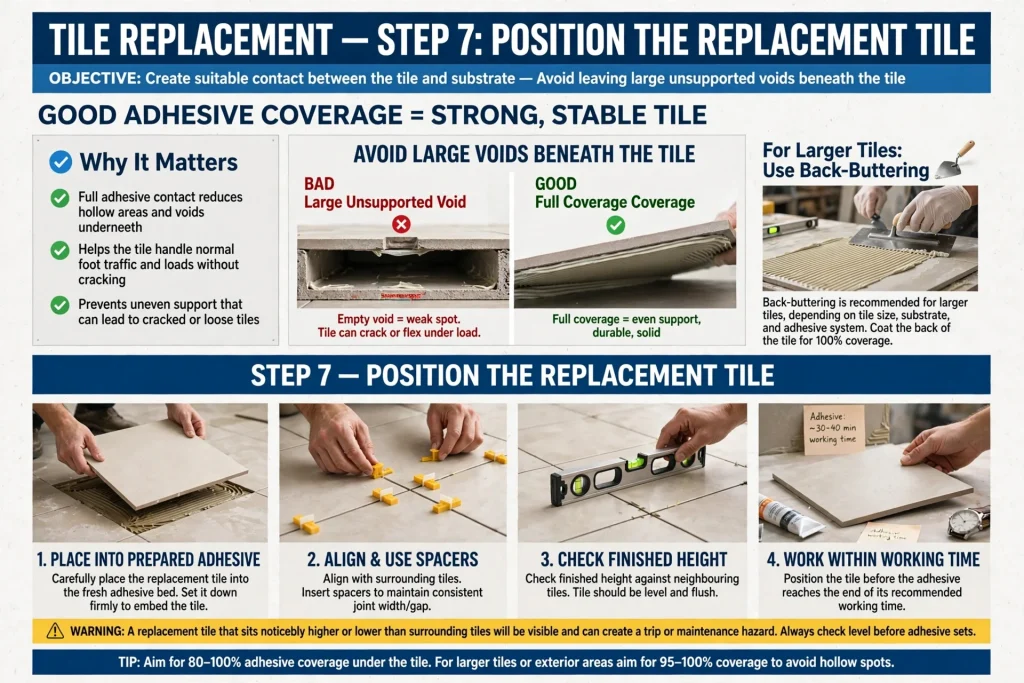
Place the replacement tile into the prepared adhesive.
Align it with the surrounding tiles and maintain the existing joint width. Tile spacers can help achieve consistent gaps where necessary.
Check the finished height against neighbouring tiles. A replacement tile that sits noticeably higher or lower will be visible and may create a trip or maintenance issue.
The tile should be positioned before the adhesive reaches the end of its recommended working time.
Step 8: Allow the Adhesive to Cure
Do not immediately walk heavily over the newly installed tile.
The adhesive needs adequate curing time according to the manufacturer’s instructions. Factors such as temperature, humidity, tile type, substrate, and adhesive formulation can affect curing.
Premature loading can disturb the tile and weaken the bond.
Commercial properties should also consider access control during repair work so customers, staff, and contractors do not accidentally step on the newly installed tile.
Step 9: Re-Grout the Tile
Once the adhesive has cured sufficiently, the joints around the replacement tile can be grouted.
The new grout should be selected to match the existing floor as closely as practical.
Colour differences may be noticeable even when the same nominal grout colour is used, particularly when the surrounding grout has aged.
Remove excess grout carefully and clean the tile surface according to the product instructions.
Step 10: Inspect the Finished Repair
After the repair is complete, check the tile from different angles and lighting conditions.
Look for:
- Uneven tile height
- Incorrect alignment
- Excess grout
- Visible adhesive
- Damaged edges
- Colour mismatch
- Cracked joints
- Movement
- Hollow areas
The replacement should visually integrate with the surrounding floor as closely as possible.
Replacing Cracked Porcelain Tiles
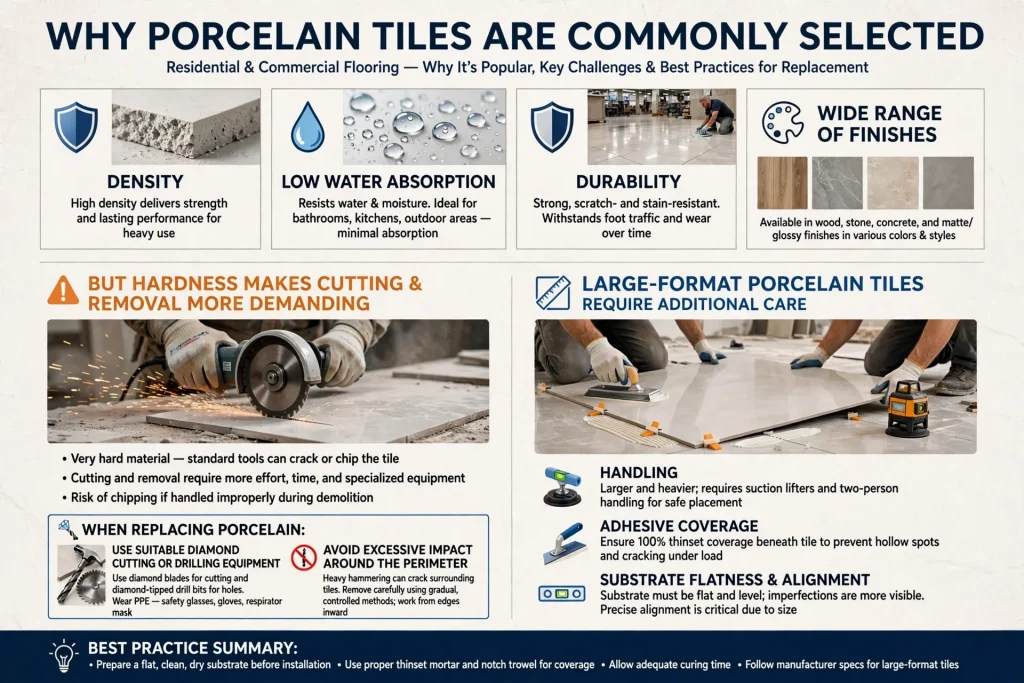
Porcelain tiles are commonly selected for residential and commercial flooring because of their density, low water absorption, durability, and wide range of finishes.
However, their hardness makes cutting and removal more demanding.
When replacing porcelain, use suitable diamond cutting or drilling equipment where necessary. Avoid excessive impact around the perimeter.
Large-format porcelain tiles require additional care because their size makes handling, adhesive coverage, substrate flatness, and alignment more important.
Replacing Ceramic Floor Tiles
Ceramic tiles can also be replaced individually.
The same general process applies: remove surrounding grout, break the damaged tile carefully, clean the substrate, apply compatible adhesive, install the replacement, allow curing, and re-grout.
Ceramic tiles may be easier to cut than dense porcelain, but the exact installation method should still follow the manufacturer’s recommendations.
What If You Cannot Find the Same Tile?
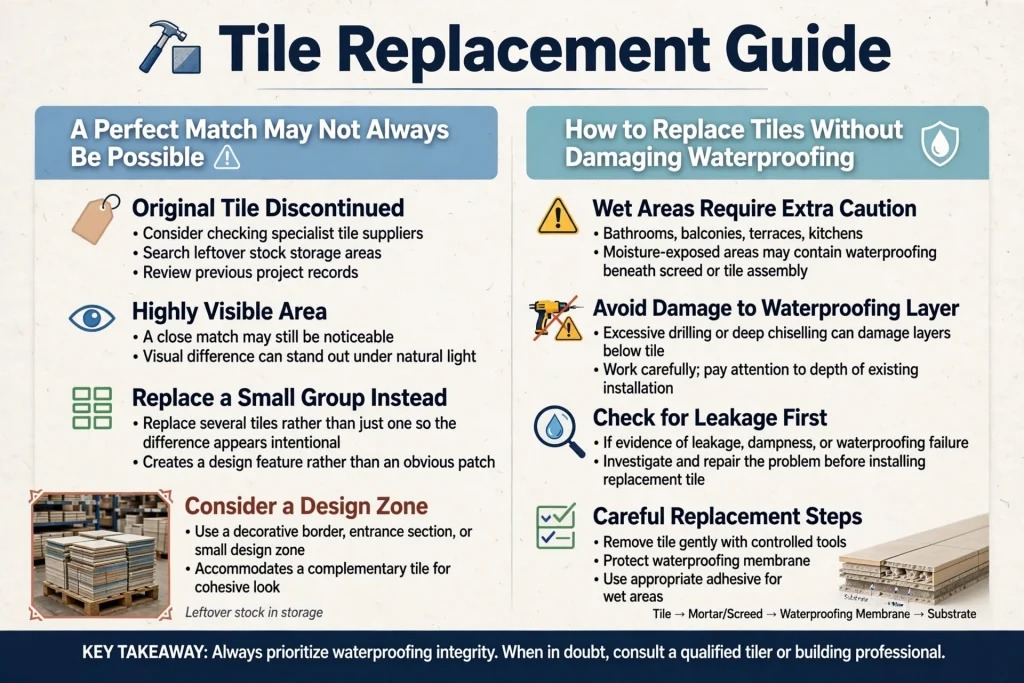
A perfect match may not always be possible.
If the original tile has been discontinued, consider checking specialist tile suppliers, leftover stock, storage areas, or previous project records.
For a highly visible area, a close match may still be noticeable. In some situations, property owners choose to replace a small group of tiles rather than only one so the difference appears intentional.
For example, a decorative border, entrance section, or small design zone can sometimes accommodate a complementary tile.
How to Replace Tiles Without Damaging Waterproofing
Wet areas require additional caution.
Bathrooms, balconies, terraces, kitchens, and other moisture-exposed areas may contain waterproofing beneath the screed or tile assembly. Excessive drilling or deep chiselling can potentially damage layers below the tile.
The replacement should therefore be carried out carefully, with attention to the depth of the existing installation.
If there is evidence of leakage, dampness, or waterproofing failure, investigate that problem before installing the replacement tile.
What Causes the Same Tile to Crack Again?
If the replacement tile cracks shortly after installation, the issue may not be the tile itself.
Common underlying causes include substrate movement, inadequate adhesive coverage, structural cracking, thermal expansion, moisture, or an installation problem.
A repeated crack in exactly the same position is especially useful information for a flooring professional.
Instead of repeatedly replacing the tile, investigate the complete flooring assembly.
Tile Replacement in Dubai Villas and Apartments
Dubai properties often use porcelain, ceramic, marble-look tiles, large-format slabs, and other decorative flooring materials.
In villas around Jumeirah, Arabian Ranches, Dubai Hills Estate, Emirates Hills, and Palm Jumeirah, individual tile replacement can be useful when a localized defect affects an otherwise well-maintained floor.
For apartments in Downtown Dubai, Business Bay, Dubai Marina, and Jumeirah Lakes Towers, minimizing disruption can also be important because replacing an entire floor can involve furniture movement, access restrictions, dust, and extended maintenance time.
Tile Replacement in Commercial Properties
Commercial flooring requires additional planning because repairs can affect daily operations.
Restaurants, hotels, offices, retail stores, clinics, and showrooms may need repairs completed within restricted working hours.
In areas such as DIFC, Business Bay, Downtown Dubai, Dubai Internet City, and Dubai Media City, maintenance teams may coordinate flooring repairs around business schedules.
For larger commercial spaces where extensive tile failure has occurred, property owners may also evaluate alternative flooring systems. Depending on the application and substrate, an Epoxy Floor Company can provide information about whether an epoxy-based flooring system is appropriate for a particular commercial environment.
How to Prevent Future Tile Damage
Good installation is the first line of prevention.
Use suitable tile materials, prepare the substrate correctly, select compatible adhesive, maintain appropriate joints, and follow the tile manufacturer’s installation requirements.
After installation, avoid dropping heavy objects, dragging furniture, or exposing the floor to unnecessary impact.
In wet areas, address leaks quickly. Regularly inspect grout and movement joints, particularly in balconies, terraces, bathrooms, and commercial spaces.
Keeping spare tiles is also one of the simplest ways to make future repairs easier.

When Is Full Floor Replacement Necessary?
Individual tile replacement is not always enough.
A complete floor replacement may be more appropriate when:
- Large sections are cracked
- Tiles are extensively loose
- The substrate has widespread damage
- Moisture has affected a large area
- Waterproofing has failed
- The existing flooring is reaching the end of its service life
- Matching replacement tiles are unavailable
- The property’s design is being renovated
A professional inspection can help determine whether localized repairs or a broader flooring project is appropriate.
Final Thoughts
Replacing a damaged floor tile does not automatically require replacing the entire floor. When the damage is isolated and the underlying substrate is stable, a carefully installed replacement tile can restore the appearance and function of the affected area while leaving the surrounding flooring intact.
The key is to remove the damaged tile without disturbing neighbouring tiles, prepare the substrate correctly, use compatible adhesive, achieve appropriate coverage, match the replacement tile, and finish the joints properly.
For properties across Dubai, Abu Dhabi, Sharjah, and the wider UAE, professional assessment becomes particularly important when cracks are recurring, moisture is present, or multiple tiles are affected. In those situations, identifying the underlying cause is more valuable than repeatedly replacing individual tiles.